
DIY House plant manager using Moisture Sensor and ATTiny45
This project is one of my favorites because I have lots of plants in my home. I sometimes get too busy and forget to water my plants and the plants get really unhappy and dry.
This project will implement a humidity/moisture sensor to detect dry soil and alert you to water your plant.
The project uses the following components
- ATTiny45
- Capacitive Moisture Sensor
- Prototyping board / Breadboard
- wires
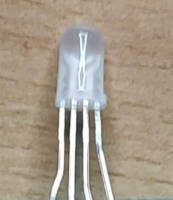
- RGB LED
- Tactile switch
- Arduino Nano (As a programmer)


First of all, I used a breadboard to lay out the circuit. The push button is connected to GPIO2. LED’s R G and B pins are connected to GPIO0, 1, and 4. And analog data pin of the Sensor to GPIO3 and 3v3 and ground to the corresponding terminal of the battery and the same with the ATTiny’s power in pins. The circuit is depicted in the following circuit diagram. You can follow the following quick reference from SparkFun on ATTiny85/45 for the Pinout diagram as well as some quick help regarding basic functions.

The following circuit diagram depicts the wiring of this project. The RGB has been shown in a dashed rectangle. Although it is a single RGB Led it has 3 legs for each Red, Green, and Blue which can be represented as individual LEDs, and note that for every leg, we are using a current limiting resistance of 1kOhms. You can use a higher value to make it dimmer or a little lower value for brighter output.

Pin definitions are as follows in the code.
#define PUSH_BTN 2
#define LEDr 0
#define LEDg 1
#define LEDb 4
#define SENSOR 3
The following is the full sketch. The push button connected to Pin 2 switches to the SETTING mode where you can calibrate the sensor. The LED changes to BLUE when in SETTING Mode, after setting the Dry state, it will turn PURPLE and after setting the wet state, it changes to SENSE mode when the LED changes color from RED to GREEN depending on the level of moisture detected.
#define PUSH_BTN 2
#define LEDr 0
#define LEDg 1
#define LEDb 4
#define SENSOR 3

int minA = 600;
int maxA = 100;

int mode = 0;
int debounce = 0;
int curVal = 50;

void setup() {
  pinMode(LEDb, OUTPUT);
  pinMode(LEDg, OUTPUT);
  pinMode(LEDr, OUTPUT);
  pinMode(PUSH_BTN, INPUT_PULLUP);
}

void loop() {
  curVal = map(analogRead(SENSOR), minA, maxA, 0, 100);

  if (digitalRead(PUSH_BTN) == 0) {
    if (debounce == 0) {
      mode++;
      if (mode > 2)
        mode = 0;
      switch (mode) {
        case 1:
          setRGB(0, 0, 150);
          minA = analogRead(SENSOR);
          break;
        case 2:
          setRGB(200, 0, 100);
          maxA = analogRead(SENSOR);
          break;
        default:
          setRGB((int)((100 - curVal)*1.5), (int)(curVal*1.5), 0);
          break;
      }
      debounce = 1;
    }
  } else {
    debounce = 0;
  }
  if(mode == 0){
    setRGB((int)(100 - curVal / 2), curVal, 0);
  }

  delay(500);
}

void setRGB(int r, int g, int b) {
  analogWrite(LEDr, r);
  analogWrite(LEDg, g);
  analogWrite(LEDb, b);
}
Programming an ATTiny using Arduino Nano
To be able to program an ATTiny45 we need a dedicated AVR programmer or we could use an Arduino board like UNO or Nano. I used Nano as a programmer.
Once you have uploaded the Arduino as a programmer sketch to nano, connect appropriate pins, and a capacitor as shown in the circuit, you are ready to program the ATTiny.
I made a DIY programmer socket/adapter for my attiny45.

The adapter can be mounted right on the Arduino Nano and program the Attiny, and the Attiny can be easily replaced in the socket.


You can also use a Micronucleus programmer to program an ATTiny45. It requires burning a bootloader that takes up a little memory in the chip. I will write a separate blog on this soon.

Once uploaded the sketch, the LED will turn RED if the sensor detects low moisture, more moisture, the LED will be greener. The button press will enable SETTING mode, turning LED BLUE. When you can set the DRY state and press the button and WET state and press the button again to calibrate the sensor. This feature allows it to program any sensor independent of the preset value in the MCU.
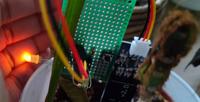
The end result looks like the following, I used a 3v CR2032 coin cell battery as a power source and a tactical switch to turn the device on and off.


Check out a YouTube short I created.